Roasting your own coffee at home is one of the most satisfying ways to take control of your coffee experience. From the aroma of beans crackling in the pan to the first sip of a brew that you roasted yourself, home roasting transforms coffee into a craft. It’s not just about flavor—it’s about freshness, experimentation, and understanding the chemistry behind one of the world’s most beloved beverages.
In this guide, you’ll learn everything you need to know about how to roast coffee beans at home—from beginner methods using tools you already have, to more advanced techniques used by hobbyists and professionals.
Please accept cookies to access this content
Why Roast Coffee at Home?
Coffee tastes best when it’s freshly roasted. Beans begin to lose their flavor and aroma just days after roasting, which is why roasting at home gives you a major flavor advantage. By roasting your own beans, you can:
- Maximize freshness: Brew coffee within days of roasting, not weeks or months.
- Control the roast profile: Adjust temperature, time, and roast level to suit your taste.
- Save money: Green coffee beans are cheaper and have a longer shelf life.
- Experiment with origins: Discover how roast impacts beans from Ethiopia, Colombia, Vietnam, and beyond.
- Minimize waste: Reduce packaging and roast only what you need.
The Chemistry Behind Roasting Coffee
Roasting coffee is a chemical transformation, not just a cooking process. As green beans heat up, they undergo several key reactions:
- The Maillard reaction: This occurs between amino acids and sugars, producing hundreds of aromatic compounds and the brown color associated with roasted beans.
- Caramelization: Sugars break down, creating sweet, nutty, or smoky flavors depending on the roast level.
- Expansion & cracking: Internal pressure causes the beans to “crack” as steam escapes—audible signs of roasting stages.
- CO₂ development: Roasting produces carbon dioxide, which slowly releases after roasting (a process known as degassing).
These changes affect flavor, body, acidity, aroma, and even the caffeine content of the final cup.
What is the difference between roasted coffee and normal coffee?
Unroasted (green) coffee beans are hard, grassy-smelling, and unbrewed. Roasted beans are chemically altered and ready to grind and brew, offering deep aromas and flavors.
How to Choose Green Coffee Beans?
Green coffee beans are raw, unroasted seeds that offer a blank slate for flavor development. To start roasting, choose beans based on:
- Species: Arabica (smooth, complex, lower caffeine) or Robusta (strong, bitter, high caffeine).
- Processing method:
- Washed beans produce clean, bright flavors.
- Natural beans are fruitier and heavier-bodied.
- Honey processed beans fall in between, with syrupy sweetness.
- Origin: Beans from Ethiopia, Kenya, Brazil, Colombia, and Guatemala all offer distinct flavor profiles.
- Freshness: Look for beans harvested within the last 12 months. Store them in a cool, dry, dark place.
Green beans can be purchased online from specialty roasters or at local co-ops.
Methods: How to Roast Coffee Beans at Home?
There are many ways to roast coffee at home—from DIY techniques using everyday kitchen tools to dedicated roasters that offer precise control. Below are the most common methods:
1. Roasting in a Pan or Skillet
- Use a heavy pan, such as cast iron.
- Heat over medium and add ½ cup of green beans.
- Stir constantly for 10–15 minutes.
- Watch for color changes and listen for the first crack.
- Remove beans when the desired roast level is reached and cool immediately.
- Pros: Inexpensive, tactile, hands-on
- Cons: Inconsistent results, smoky, requires constant stirring
2. Roasting in an Oven
- Preheat oven to 450°F (232°C).
- Spread beans in a single layer on a perforated tray.
- Roast for 12–15 minutes, stirring halfway through.
- Use smell and color to indicate the roast level.
- Pros: Easy setup, widely available
- Cons: Slower heat transfer, uneven roasting
3. Using a Popcorn Popper
- Choose an air popper with side vents (not bottom-heat).
- Add up to ½ cup of beans.
- Roast for 5–10 minutes until the desired color and crack stages occur.
- Pros: Fast, relatively even, beginner-friendly
- Cons: Not all poppers are suitable; loud and limited capacity
4. Roasting in an Air Fryer
- Preheat to 400°F (204°C).
- Place beans in a mesh tray or basket.
- Shake periodically.
- Roast time: 10–12 minutes
- Pros: Hands-off, accessible
- Cons: Air circulation varies; trial and error needed
5. Dedicated Home Roaster
- Purpose-built machines with precise temperature and timing controls.
- Batch sizes range from 100g to 1kg+.
- Some offer app-based roast logging.
- Pros: Best control, repeatability, consistent results
- Cons: Higher upfront cost, requires maintenance
How long to roast coffee beans?
It typically takes 8 to 15 minutes, depending on your method, desired roast, and bean density.
Understanding Time, Temperature & Roast Levels
Roast level determines flavor, aroma, acidity, and mouthfeel. Here's how temperature and time relate to roast stages:
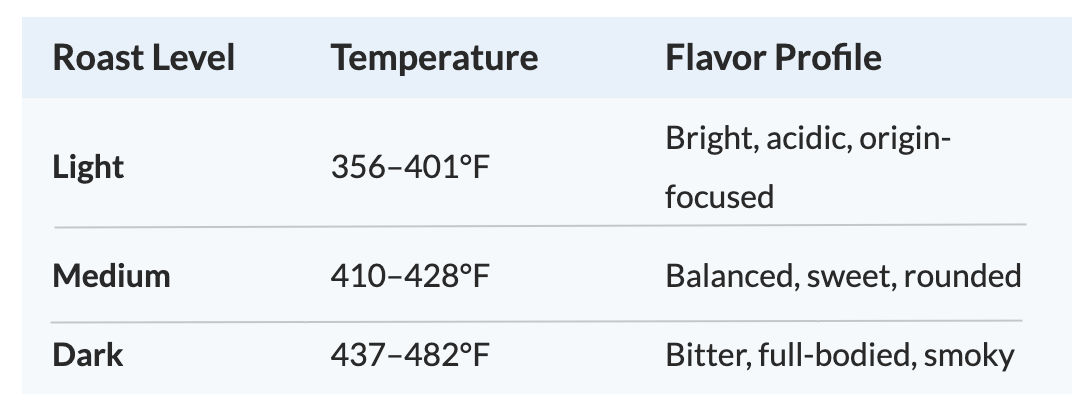
- First Crack (light-medium): Beans expand and pop as moisture escapes.
- Second Crack (medium-dark): Oils emerge, aroma deepens, beans become more brittle.
- Dark-roasting coffee produces stronger, bitter flavors with low acidity.
- Light-roasting coffee retains more of the original flavor, higher acidity, and more caffeine.
Roasting Coffee Professionally at Home
Professional-style roasting involves:
- Using a drum or fluid-bed roaster with digital temperature readouts.
- Tracking roast curves (time vs temp).
- Measuring bean mass loss and color change.
- Logging each roast to improve precision and repeatability.
While commercial roasting equipment is more expensive, many prosumers use affordable home roasters to dial in café-quality results from their kitchens.
After Roasting: Cooling, Degassing & Storage
Once roasting is complete:
- Cool beans immediately by using a metal colander and a fan, or spread them thin on a tray.
- Degas for 12 to 72 hours. Beans release CO₂, which can affect brewing.
- Store in airtight, opaque containers in a dark, cool place. Avoid fridges and clear jars.
Roasted beans are best within 7–14 days, but some can stay fresh up to 30 days.
Tasting Your Roast: How to Evaluate Flavor?
You don’t need to be a certified Q Grader to taste your coffee. Start simple:
- Brew a cup 1–2 days after roasting.
- Note aroma, flavor, body, acidity, and finish.
- Compare different roast levels or origins side by side.
- Keep a roast log to refine your process.
Over time, you’ll learn how each roast decision impacts the final cup—and you’ll get better with every batch.
Troubleshooting Common Roasting Problems
- Sour, grassy flavors? Beans are likely underdeveloped. Try increasing the time or the temperature.
- Burnt or bitter? Over-roasted—shorten roast time or lower heat.
- Uneven roasting? Stir more consistently or use better equipment.
- Too smoky? Improve ventilation or roast outdoors.
Safety First: What to Watch Out For During Roasting
Roasting coffee produces smoke and chaff (bean skin), and beans can reach 500°F. Always:
- Roast in a well-ventilated space.
- Monitor the roast—never leave it unattended.
- Have a fire extinguisher nearby (especially when using high-heat methods).
- Allow your equipment to cool before cleaning.
Essential Gear for Home Roasting
- Heavy skillet, popcorn popper, or oven tray
- Digital thermometer
- Timer or stopwatch
- Scale for measuring beans
- Metal colander or fan for cooling
- Airtight containers for storage
For serious home roasters, a countertop roaster like the Fresh Roast SR800 or Behmor 2000AB Plus offers more control.
ConclusionHome roasting is more than just a trend—it’s a way to understand and appreciate coffee on a deeper level. Whether you start with a pan on your stove or invest in a digital roaster, each batch you roast brings you closer to the flavors you love. By learning to roast your beans, you’ll never look at coffee the same way again. |
FAQs: How to Roast Coffee Beans at Home
What is the process of roasting coffee?
Roasting coffee involves heating green beans to high temperatures, triggering chemical reactions like the Maillard reaction and caramelization. The beans change color, expand, crack audibly, and develop flavor. After roasting, they are cooled and rested before brewing.
What are the 4 types of coffee roasting?
The four main roast types are light, medium, medium-dark, and dark. Each varies in temperature, flavor, acidity, and color, with light roasts preserving origin flavors and dark roasts offering bold, smoky, and low-acidity profiles.
How soon after roasting can I brew coffee?
Wait 12–72 hours to allow CO₂ to escape. Coffee tastes best after degassing.
What is the theory of roasting coffee?
Coffee roasting theory focuses on applying controlled heat to trigger chemical changes in beans, enhancing aroma, flavor, and texture. The goal is to balance time, temperature, and bean development to achieve desired taste profiles without under- or over-roasting.
What is the best coffee roasting method?
The best coffee roasting method depends on your goals and equipment. Air roasting offers speed and clarity, while drum roasting provides deep, even development. For beginners, popcorn poppers or skillet roasting are affordable, hands-on ways to start.
What is the science behind coffee roasting?
Coffee roasting involves heat-driven chemical reactions—primarily the Maillard reaction and caramelization. These transform green beans into roasted coffee by developing complex flavors, releasing CO₂, and reducing moisture, while altering acidity, solubility, and aroma compounds.
What is the main reason coffee is roasted?
Coffee is roasted to unlock its flavor, aroma, and brewing potential. Green beans are bland and undrinkable; roasting initiates chemical reactions that develop sugars, acids, and aromatic oils essential for coffee’s taste and body.
What happens to coffee after roasting?
After roasting, coffee beans release carbon dioxide (degassing), darken in color, and become brittle. Their flavor evolves for a few days, after which freshness gradually declines. Proper storage helps maintain aroma and taste for up to 2–3 weeks.
Does roasting coffee destroy caffeine?
Roasting slightly reduces caffeine, but the difference is minimal. Light roasts typically retain slightly more caffeine by weight, while dark roasts lose a small amount during extended exposure to heat. However, the overall caffeine content remains largely intact.
Is it worth roasting your own coffee?
Yes, roasting your own coffee can be worth it for better freshness, flavor control, and cost savings. It’s ideal for enthusiasts who enjoy experimentation and learning. Beginners can start with simple methods using a pan or popcorn popper.
Should I wear a mask when roasting coffee?
Wearing a mask is recommended if roasting indoors or in poorly ventilated spaces. Coffee roasting produces smoke, chaff, and fine particles that may irritate lungs. Ensure good ventilation or roast outdoors to minimize exposure.
How to roast coffee beans at home in a pan?
Use a heavy skillet over medium heat. Add green beans and stir constantly for 10–15 minutes until the desired roast level is reached. Listen for first and second cracks. Cool beans quickly in a metal colander or tray afterward.